Policies (ULTIMATE)
- Introduced in GitLab 13.10 with a flag named
security_orchestration_policies_configuration. Disabled by default.- Enabled on self-managed in GitLab 14.3.
- Feature flag removed in GitLab 14.4.
Policies in GitLab provide security teams a way to require scans of their choice to be run whenever a project pipeline runs according to the configuration specified. Security teams can therefore be confident that the scans they set up have not been changed, altered, or disabled. You can access these by navigating to your project's Security & Compliance > Policies page.
GitLab supports the following security policies:
Policy management
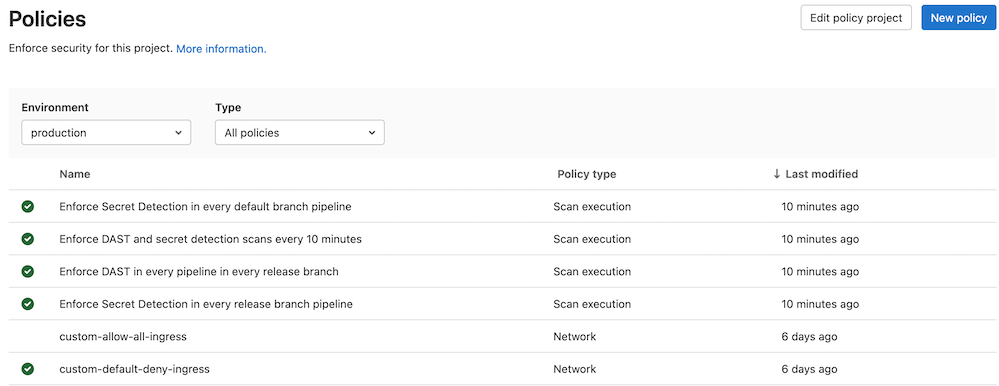
The Policies page displays deployed policies for all available environments. You can check a policy's information (for example, description or enforcement status), and create and edit deployed policies:
- On the top bar, select Menu > Projects and find your project.
- On the left sidebar, select Security & Compliance > Policies.
Network policies are fetched directly from the selected environment's deployment platform while other policies are fetched from the project's security policy project. Changes performed outside of this tab are reflected upon refresh.
By default, the policy list contains predefined network policies in a disabled state. Once enabled, a predefined policy deploys to the selected environment's deployment platform and you can manage it like the regular policies.
Note that if you're using Auto DevOps
and change a policy in this section, your auto-deploy-values.yaml file doesn't update. Auto DevOps
users must make changes by following the
Container Network Policy documentation.
Policy editor
Introduced in GitLab 13.4.
You can use the policy editor to create, edit, and delete policies:
- On the top bar, select Menu > Projects and find your group.
- On the left sidebar, select Security & Compliance > Policies.
- To create a new policy, select New policy which is located in the Policies page's header.
- To edit an existing policy, select Edit policy in the selected policy drawer.
The policy editor has two modes:
-
The visual Rule mode allows you to construct and preview policy rules using rule blocks and related controls.

-
YAML mode allows you to enter a policy definition in
.yamlformat and is aimed at expert users and cases that the Rule mode doesn't support.
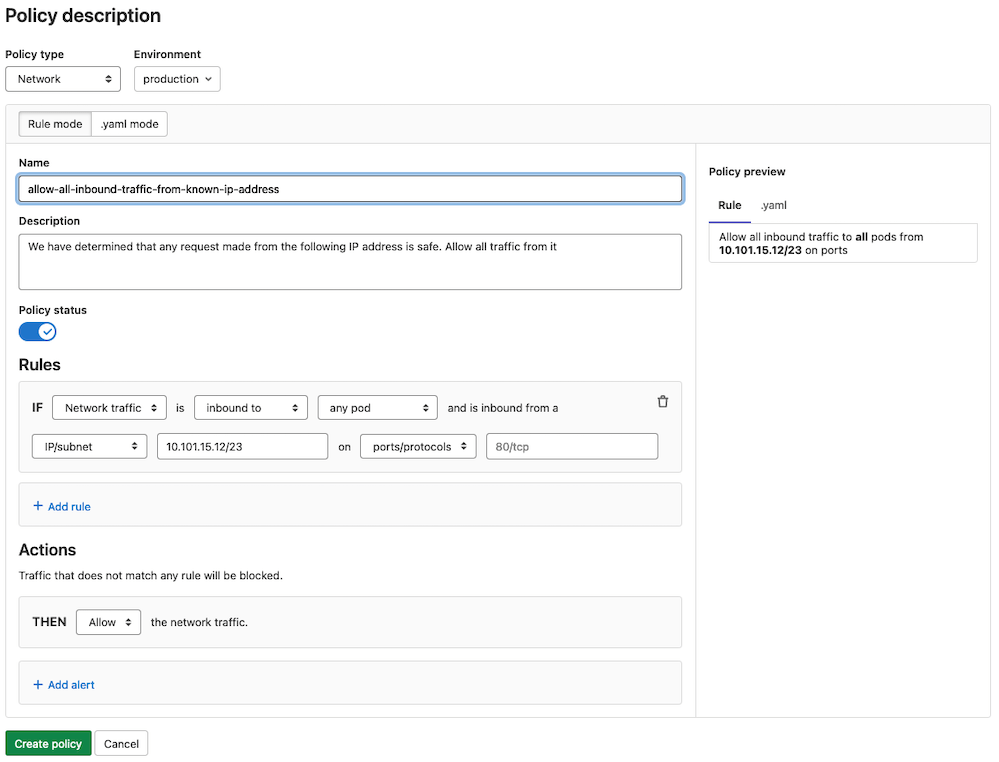
You can use both modes interchangeably and switch between them at any time. If a YAML resource is incorrect or contains data not supported by the Rule mode, Rule mode is automatically disabled. If the YAML is incorrect, you must use YAML mode to fix your policy before Rule mode is available again.
Container Network Policy
Introduced in GitLab 12.9.
The Container Network Policy section provides packet flow metrics for your application's Kubernetes namespace. This section has the following prerequisites:
- Your project contains at least one environment.
- You've installed Cilium.
- You've configured the Prometheus service.
If you're using custom Helm values for Cilium, you must enable Hubble with flow metrics for each namespace by adding the following lines to your Cilium values:
hubble:
  enabled: true
  metrics:
    enabled:
      - 'flow:sourceContext=namespace;destinationContext=namespace'
The Container Network Policy section displays the following information about your packet flow:
- The total amount of the inbound and outbound packets
- The proportion of packets dropped according to the configured policies
- The per-second average rate of the forwarded and dropped packets accumulated over time window for the requested time interval
If a significant percentage of packets is dropped, you should investigate it for potential threats by examining the Cilium logs:
kubectl -n gitlab-managed-apps logs -l k8s-app=cilium -c cilium-monitorChange the status
To change a network policy's status:
- Select the network policy you want to update.
- Select Edit policy.
- Select the Policy status toggle to update the selected policy.
- Select Save changes to deploy network policy changes.
Disabled network policies have the network-policy.gitlab.com/disabled_by: gitlab selector inside
the podSelector block. This narrows the scope of such a policy and as a result it doesn't affect
any pods. The policy itself is still deployed to the corresponding deployment namespace.
Container Network Policy editor
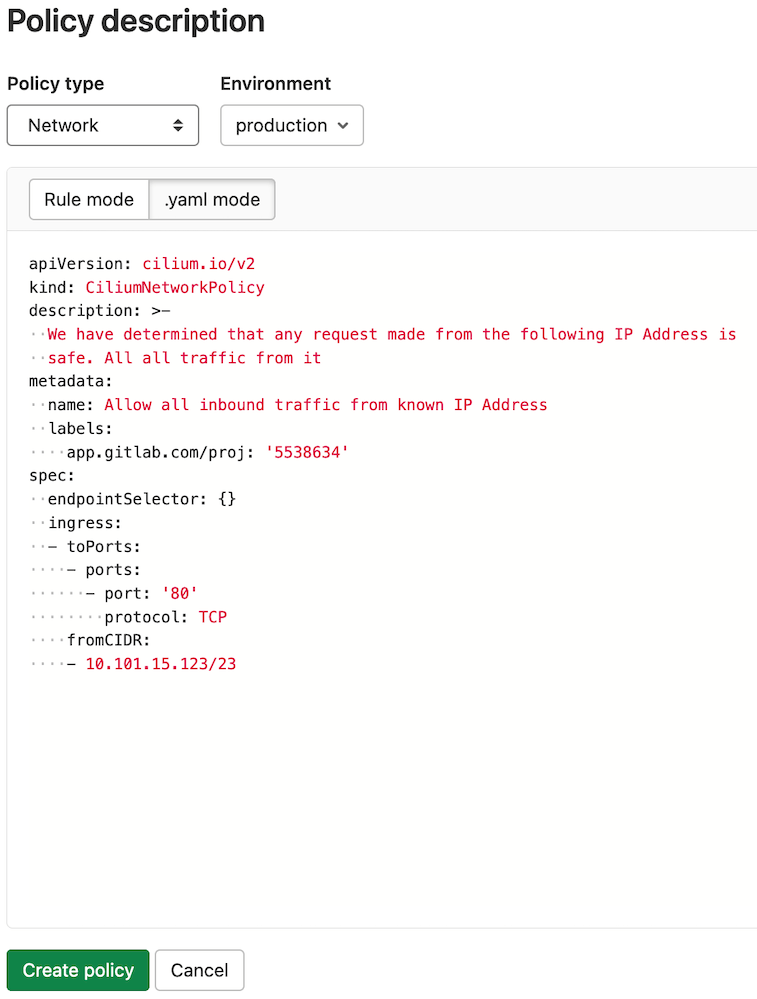
The policy editor only supports the CiliumNetworkPolicy specification. Regular Kubernetes NetworkPolicy resources aren't supported.
Rule mode supports the following rule types:
- Labels.
- Entities.
-
IP/CIDR. Only
the
toCIDRblock withoutexceptis supported. - DNS.
- Level 4 can be added to all other rules.
Once your policy is complete, save it by selecting Save policy at the bottom of the editor. Existing policies can also be removed from the editor interface by selecting Delete policy at the bottom of the editor.
Configure a Network Policy Alert
- Introduced and enabled by default in GitLab 13.9.
- The feature flag was removed and the Threat Monitoring Alerts Project was made generally available in GitLab 14.0.
You can use policy alerts to track your policy's impact. Alerts are only available if you've installed and configured an agent for this project.
There are two ways to create policy alerts:
-
In the policy editor UI, by clicking Add alert.
-
In the policy editor's YAML mode, through the
metadata.annotationsproperty:metadata: annotations: app.gitlab.com/alert: 'true'
Once added, the UI updates and displays a warning about the dangers of too many alerts.
Security Policies project
NOTE: We recommend using the Security Policies project exclusively for managing policies for the project. Do not add your application's source code to such projects.
The Security Policies feature is a repository to store policies. All security policies are stored as
the .gitlab/security-policies/policy.yml YAML file with this format:
---
scan_execution_policy:
- name: Enforce DAST in every pipeline
  description: This policy enforces pipeline configuration to have a job with DAST scan
  enabled: true
  rules:
  - type: pipeline
    branches:
    - master
  actions:
  - scan: dast
    scanner_profile: Scanner Profile A
    site_profile: Site Profile B
- name: Enforce DAST in every pipeline in main branch
  description: This policy enforces pipeline configuration to have a job with DAST scan for main branch
  enabled: true
  rules:
  - type: pipeline
    branches:
    - main
  actions:
  - scan: dast
    scanner_profile: Scanner Profile C
    site_profile: Site Profile D
Security Policy project selection
NOTE: Only project Owners have the permissions to select Security Policy Project.
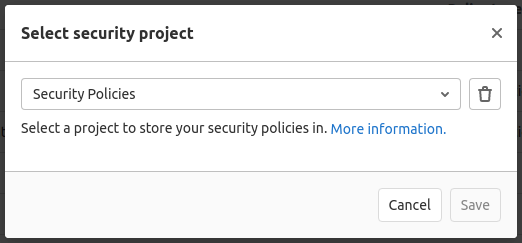
When the Security Policy project is created and policies are created within that repository, you must create an association between that project and the project you want to apply policies to:
-
On the top bar, select Menu > Projects and find your project.
-
On the left sidebar, select Security & Compliance > Policies.
-
Select Edit Policy Project, and search for and select the project you would like to link from the dropdown menu.
-
Select Save.
Unlink Security Policy projects
Project owners can unlink Security Policy projects from development projects. To do this, follow the steps described in Security Policy project selection, but select the trash can icon in the modal.
Scan execution policies
Project owners can use scan execution policies to require that security scans run on a specified schedule or with the project pipeline. Required scans are injected into the CI pipeline as new jobs with a long, random job name. In the unlikely event of a job name collision, the security policy job overwrites any pre-existing job in the pipeline.
This feature has some overlap with compliance framework pipelines, as we have not unified the user experience for these two features. For details on the similarities and differences between these features, see Enforce scan execution.
Scan Execution Policy editor
NOTE: Only project Owners have the permissions to select Security Policy Project.
Once your policy is complete, save it by selecting Create via merge request at the bottom of the editor. You are redirected to the merge request on the project's configured security policy project. If one does not link to your project, a security policy project is automatically created. Existing policies can also be removed from the editor interface by selecting Delete policy at the bottom of the editor.
The policy editor currently only supports the YAML mode. The Rule mode is tracked in the Allow Users to Edit Rule-mode Scan Execution Policies in the Policy UI epic.
Scan Execution Policies Schema
The YAML file with Scan Execution Policies consists of an array of objects matching Scan Execution Policy Schema nested under the scan_execution_policy key. You can configure a maximum of 5 policies under the scan_execution_policy key.
When you save a new policy, GitLab validates its contents against this JSON schema. If you're not familiar with how to read JSON schemas, the following sections and tables provide an alternative.
| Field | Type | Possible values | Description |
|---|---|---|---|
scan_execution_policy |
array of Scan Execution Policy |
List of scan execution policies (maximum 5) |
Scan Execution Policy Schema
| Field | Type | Possible values | Description |
|---|---|---|---|
name |
string |
Name of the policy. | |
description (optional) |
string |
Description of the policy. | |
enabled |
boolean |
true, false
|
Flag to enable (true) or disable (false) the policy. |
rules |
array of rules |
List of rules that the policy applies. | |
actions |
array of actions |
List of actions that the policy enforces. |
pipeline rule type
This rule enforces the defined actions whenever the pipeline runs for a selected branch.
| Field | Type | Possible values | Description |
|---|---|---|---|
type |
string |
pipeline |
The rule's type. |
branches |
array of string
|
* or the branch's name |
The branch the given policy applies to (supports wildcard). |
schedule rule type
This rule enforces the defined actions and schedules a scan on the provided date/time.
| Field | Type | Possible values | Description |
|---|---|---|---|
type |
string |
schedule |
The rule's type. |
branches |
array of string
|
* or the branch's name |
The branch the given policy applies to (supports wildcard). |
cadence |
string |
CRON expression (for example, 0 0 * * *) |
A whitespace-separated string containing five fields that represents the scheduled time. |
clusters |
object |
The cluster where the given policy enforces running selected scans (only for container_scanning/cluster_image_scanning scans). The key of the object is the name of the Kubernetes cluster configured for your project in GitLab. In the optionally provided value of the object, you can precisely select Kubernetes resources that are scanned. |
cluster schema
Use this schema to define clusters objects in the schedule rule type.
| Field | Type | Possible values | Description |
|---|---|---|---|
containers |
array of string
|
The container name that is scanned (only the first value is currently supported). | |
resources |
array of string
|
The resource name that is scanned (only the first value is currently supported). | |
namespaces |
array of string
|
The namespace that is scanned (only the first value is currently supported). | |
kinds |
array of string
|
deployment/daemonset
|
The resource kind that should be scanned (only the first value is currently supported). |
scan action type
This action executes the selected scan with additional parameters when conditions for at least one
rule in the defined policy are met.
| Field | Type | Possible values | Description |
|---|---|---|---|
scan |
string |
dast, secret_detection, sast, container_scanning, cluster_image_scanning
|
The action's type. |
site_profile |
string |
Name of the selected DAST site profile. | The DAST site profile to execute the DAST scan. This field should only be set if scan type is dast. |
scanner_profile |
string or null
|
Name of the selected DAST scanner profile. | The DAST scanner profile to execute the DAST scan. This field should only be set if scan type is dast. |
variables |
object |
Set of variables applied and enforced for the selected scan. The object's key is the variable name with a value provided as a string. |
Note the following:
- You must create the site profile and scanner profile with selected names for each project that is assigned to the selected Security Policy Project. Otherwise, the policy is not applied and a job with an error message is created instead.
- Once you associate the site profile and scanner profile by name in the policy, it is not possible
to modify or delete them. If you want to modify them, you must first disable the policy by setting
the
activeflag tofalse. - When configuring policies with a scheduled DAST scan, the author of the commit in the security policy project's repository must have access to the scanner and site profiles. Otherwise, the scan is not scheduled successfully.
- For a secret detection scan, only rules with the default ruleset are supported. Custom rulesets are not supported.
- A secret detection scan runs in
normalmode when executed as part of a pipeline, and inhistoricmode when executed as part of a scheduled scan. - A container scanning and cluster image scanning scans configured for the
pipelinerule type ignores the cluster defined in theclustersobject. They use predefined CI/CD variables defined for your project. Cluster selection with theclustersobject is supported for theschedulerule type. Cluster with name provided inclustersobject must be created and configured for the project. To be able to successfully perform thecontainer_scanning/cluster_image_scanningscans for the cluster you must follow instructions for the Cluster Image Scanning feature. - The SAST scan uses the default template and runs in a child pipeline.
Example security policies project
You can use this example in a .gitlab/security-policies/policy.yml, as described in
Security policies project.
---
scan_execution_policy:
- name: Enforce DAST in every release pipeline
  description: This policy enforces pipeline configuration to have a job with DAST scan for release branches
  enabled: true
  rules:
  - type: pipeline
    branches:
    - release/*
  actions:
  - scan: dast
    scanner_profile: Scanner Profile A
    site_profile: Site Profile B
- name: Enforce DAST and secret detection scans every 10 minutes
  description: This policy enforces DAST and secret detection scans to run every 10 minutes
  enabled: true
  rules:
  - type: schedule
    branches:
    - main
    cadence: "*/10 * * * *"
  actions:
  - scan: dast
    scanner_profile: Scanner Profile C
    site_profile: Site Profile D
  - scan: secret_detection
- name: Enforce Secret Detection and Container Scanning in every default branch pipeline
  description: This policy enforces pipeline configuration to have a job with Secret Detection and Container Scanning scans for the default branch
  enabled: true
  rules:
  - type: pipeline
    branches:
    - main
  actions:
  - scan: secret_detection
  - scan: sast
    variables:
      SAST_EXCLUDED_ANALYZERS: brakeman
  - scan: container_scanning
- name: Enforce Cluster Image Scanning on production-cluster every 24h
  description: This policy enforces Cluster Image Scanning scan to run every 24 hours
  enabled: true
  rules:
  - type: schedule
    cadence: "15 3 * * *"
    clusters:
      production-cluster:
        containers:
        - database
        resources:
        - production-application
        namespaces:
        - production-namespace
        kinds:
        - deployment
  actions:
  - scan: cluster_image_scanning
In this example:
- For every pipeline executed on branches that match the
release/*wildcard (for example, branchrelease/v1.2.1), DAST scans run withScanner Profile AandSite Profile B. - DAST and secret detection scans run every 10 minutes. The DAST scan runs with
Scanner Profile CandSite Profile D. - Secret detection, container scanning, and SAST scans run for every pipeline executed on the
mainbranch. The SAST scan runs with theSAST_EXCLUDED_ANALYZERvariable set to"brakeman". - Cluster Image Scanning scan runs every 24h. The scan runs on the
production-clustercluster and fetches vulnerabilities from the container with the namedatabaseconfigured for deployment with the nameproduction-applicationin theproduction-namespacenamespace.
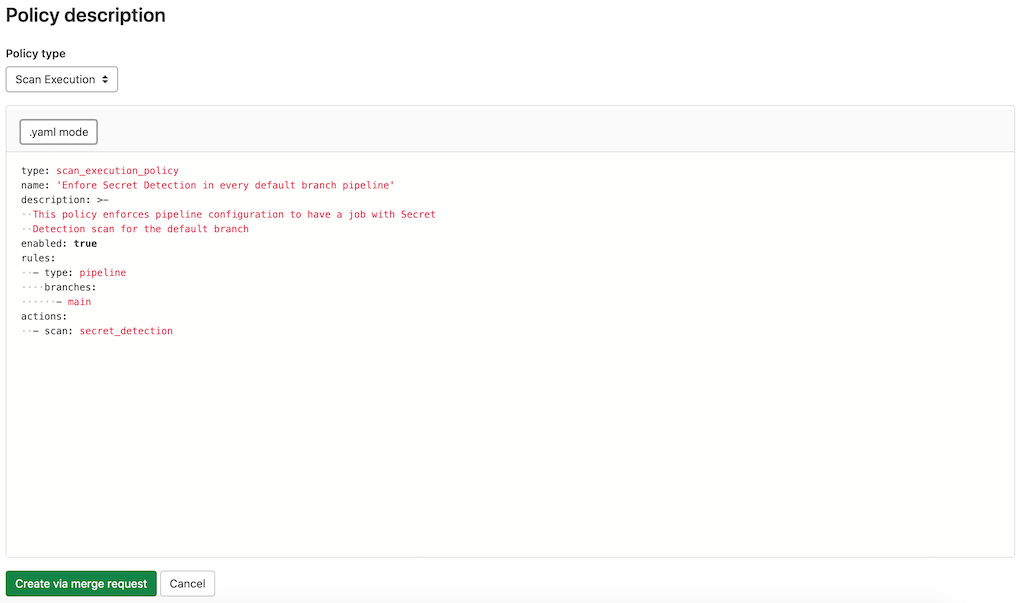
Example for scan execution policy editor
You can use this example in the YAML mode of the Scan Execution Policy editor. It corresponds to a single object from the previous example.
name: Enforce Secret Detection and Container Scanning in every default branch pipeline
description: This policy enforces pipeline configuration to have a job with Secret Detection and Container Scanning scans for the default branch
enabled: true
rules:
  - type: pipeline
    branches:
      - main
actions:
  - scan: secret_detection
  - scan: container_scanning
Roadmap
See the Category Direction page for more information on the product direction of Container Network Security.