Releases (FREE)
In GitLab, a release enables you to create a snapshot of your project for your users, including installation packages and release notes. You can create a GitLab release on any branch. Creating a release also creates a Git tag to mark the release point in the source code.
WARNING: Deleting a Git tag associated with a release also deletes the release.
A release can include:
- A snapshot of the source code of your repository.
- Generic packages created from job artifacts.
- Other metadata associated with a released version of your code.
- Release notes.
When you create a release:
- GitLab automatically archives source code and associates it with the release.
- GitLab automatically creates a JSON file that lists everything in the release, so you can compare and audit releases. This file is called release evidence.
When you create a release, or after, you can:
- Add release notes.
- Add a message for the Git tag associated with the release.
- Associate milestones with it.
- Attach release assets, like runbooks or packages.
View releases
Introduced in GitLab 12.8.
To view a list of releases:
-
On the left sidebar, select Deployments > Releases, or
-
On the project's overview page, if at least one release exists, click the number of releases.

- On public projects, this number is visible to all users.
- On private projects, this number is visible to users with Reporter permissions or higher.

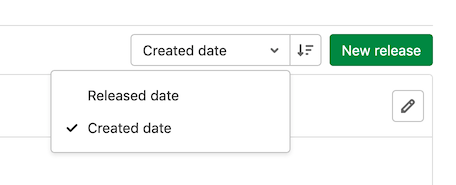
Sort releases
To sort releases by Released date or Created date, select from the sort order dropdown. To switch between ascending or descending order, select Sort order.
Create a release
Introduced in GitLab 12.9. Releases can be created directly in the GitLab UI.
You can create a release:
We recommend creating a release as one of the last steps in your CI/CD pipeline.
Prerequisites:
- You must have at least the Developer role for a project. For more information, read Release permissions.
Create a release in the Releases page
To create a release in the Releases page:
- On the top bar, select Menu > Projects and find your project.
- On the left sidebar, select Deployments > Releases and select New release.
- From the Tag name dropdown, either:
- Select an existing Git tag. Selecting an existing tag that is already associated with a release results in a validation error.
- Enter a new Git tag name.
- From the Create from dropdown, select a branch or commit SHA to use when creating the new tag.
- Optional. Enter additional information about the release, including:
- Select Create release.
Create a release in the Tags page
To create a release in the Tags page, add release notes to either an existing or a new Git tag.
To add release notes to a new Git tag:
- On the top bar, select Menu > Projects and find your project.
- On the left sidebar, select Repository > Tags.
- Select New tag.
- Optional. Enter a tag message in the Message text box.
- In the Release notes text box, enter the release's description. You can use Markdown and drag and drop files to this text box.
- Select Create tag.
To edit release notes of an existing Git tag:
- On the top bar, select Menu > Projects and find your project.
- On the left sidebar, select Repository > Tags.
- Select Edit release notes ({pencil}).
- In the Release notes text box, enter the release's description. You can use Markdown and drag and drop files to this text box.
- Select Save changes.
Create a release by using a CI/CD job
Introduced in GitLab 12.7.
You can create a release directly as part of the GitLab CI/CD pipeline
by using the release keyword in the job definition.
The release is created only if the job processes without error. If the API returns an error during release creation, the release job fails.
CI/CD example of the release keyword
To create a release when you push a Git tag, or when you add a Git tag in the UI by going to Repository > Tags:
NOTE: Do not provide Release notes when you create the Git tag in the UI. Providing release notes creates a release, resulting in the pipeline failing.
release_job:
  stage: release
  image: registry.gitlab.com/gitlab-org/release-cli:latest
  rules:
    - if: $CI_COMMIT_TAG                  # Run this job when a tag is created manually
  script:
    - echo "running release_job"
  release:
    name: 'Release $CI_COMMIT_TAG'
    description: 'Created using the release-cli $EXTRA_DESCRIPTION'  # $EXTRA_DESCRIPTION must be defined
    tag_name: '$CI_COMMIT_TAG'                                       # elsewhere in the pipeline.
    ref: '$CI_COMMIT_TAG'
    milestones:
      - 'm1'
      - 'm2'
      - 'm3'
    released_at: '2020-07-15T08:00:00Z'  # Optional, is auto generated if not defined, or can use a variable.
    assets: # Optional, multiple asset links
      links:
        - name: 'asset1'
          url: 'https://example.com/assets/1'
        - name: 'asset2'
          url: 'https://example.com/assets/2'
          filepath: '/pretty/url/1' # optional
          link_type: 'other' # optional
To create a release automatically when commits are pushed or merged to the default branch, using a new Git tag that is defined with variables:
prepare_job:
  stage: prepare                                              # This stage must run before the release stage
  rules:
    - if: $CI_COMMIT_TAG
      when: never                                             # Do not run this job when a tag is created manually
    - if: $CI_COMMIT_BRANCH == $CI_DEFAULT_BRANCH             # Run this job when commits are pushed or merged to the default branch
  script:
    - echo "EXTRA_DESCRIPTION=some message" >> variables.env  # Generate the EXTRA_DESCRIPTION and TAG environment variables
    - echo "TAG=v$(cat VERSION)" >> variables.env             # and append to the variables.env file
  artifacts:
    reports:
      dotenv: variables.env                                   # Use artifacts:reports:dotenv to expose the variables to other jobs

release_job:
  stage: release
  image: registry.gitlab.com/gitlab-org/release-cli:latest
  needs:
    - job: prepare_job
      artifacts: true
  rules:
    - if: $CI_COMMIT_TAG
      when: never                                  # Do not run this job when a tag is created manually
    - if: $CI_COMMIT_BRANCH == $CI_DEFAULT_BRANCH  # Run this job when commits are pushed or merged to the default branch
  script:
    - echo "running release_job for $TAG"
  release:
    name: 'Release $TAG'
    description: 'Created using the release-cli $EXTRA_DESCRIPTION'  # $EXTRA_DESCRIPTION and the $TAG
    tag_name: '$TAG'                                                 # variables must be defined elsewhere
    ref: '$CI_COMMIT_SHA'                                            # in the pipeline. For example, in the
    milestones:                                                      # prepare_job
      - 'm1'
      - 'm2'
      - 'm3'
    released_at: '2020-07-15T08:00:00Z'  # Optional, is auto generated if not defined, or can use a variable.
    assets:
      links:
        - name: 'asset1'
          url: 'https://example.com/assets/1'
        - name: 'asset2'
          url: 'https://example.com/assets/2'
          filepath: '/pretty/url/1' # optional
          link_type: 'other' # optional
NOTE:
Environment variables set in before_script or script are not available for expanding
in the same job. Read more about
potentially making variables available for expanding.
Use a custom SSL CA certificate authority
You can use the ADDITIONAL_CA_CERT_BUNDLE CI/CD variable to configure a custom SSL CA certificate authority,
which is used to verify the peer when the release-cli creates a release through the API using HTTPS with custom certificates.
The ADDITIONAL_CA_CERT_BUNDLE value should contain the
text representation of the X.509 PEM public-key certificate
or the path/to/file containing the certificate authority.
For example, to configure this value in the .gitlab-ci.yml file, use the following:
release:
  variables:
    ADDITIONAL_CA_CERT_BUNDLE: |
        -----BEGIN CERTIFICATE-----
        MIIGqTCCBJGgAwIBAgIQI7AVxxVwg2kch4d56XNdDjANBgkqhkiG9w0BAQsFADCB
        ...
        jWgmPqF3vUbZE0EyScetPJquRFRKIesyJuBFMAs=
        -----END CERTIFICATE-----
  script:
    - echo "Create release"
  release:
    name: 'My awesome release'
    tag_name: '$CI_COMMIT_TAG'
The ADDITIONAL_CA_CERT_BUNDLE value can also be configured as a
custom variable in the UI,
either as a file, which requires the path to the certificate, or as a variable,
which requires the text representation of the certificate.
release-cli command line
The entries under the release node are transformed into Bash commands and sent
to the Docker container, which contains the release-cli.
You can also call the release-cli directly from a script entry.
For example, if you use the YAML described previously:
release-cli create --name "Release $CI_COMMIT_SHA" --description "Created using the release-cli $EXTRA_DESCRIPTION" --tag-name "v${MAJOR}.${MINOR}.${REVISION}" --ref "$CI_COMMIT_SHA" --released-at "2020-07-15T08:00:00Z" --milestone "m1" --milestone "m2" --milestone "m3" --assets-link "{\"name\":\"asset1\",\"url\":\"https://example.com/assets/1\",\"link_type\":\"other\"}Create multiple releases in a single pipeline
A pipeline can have multiple release jobs, for example:
ios-release:
  script:
    - echo "iOS release job"
  release:
    tag_name: v1.0.0-ios
    description: 'iOS release v1.0.0'

android-release:
  script:
    - echo "Android release job"
  release:
    tag_name: v1.0.0-android
    description: 'Android release v1.0.0'
Release assets as Generic packages
You can use Generic packages to host your release assets. For a complete example, see the Release assets as Generic packages project.
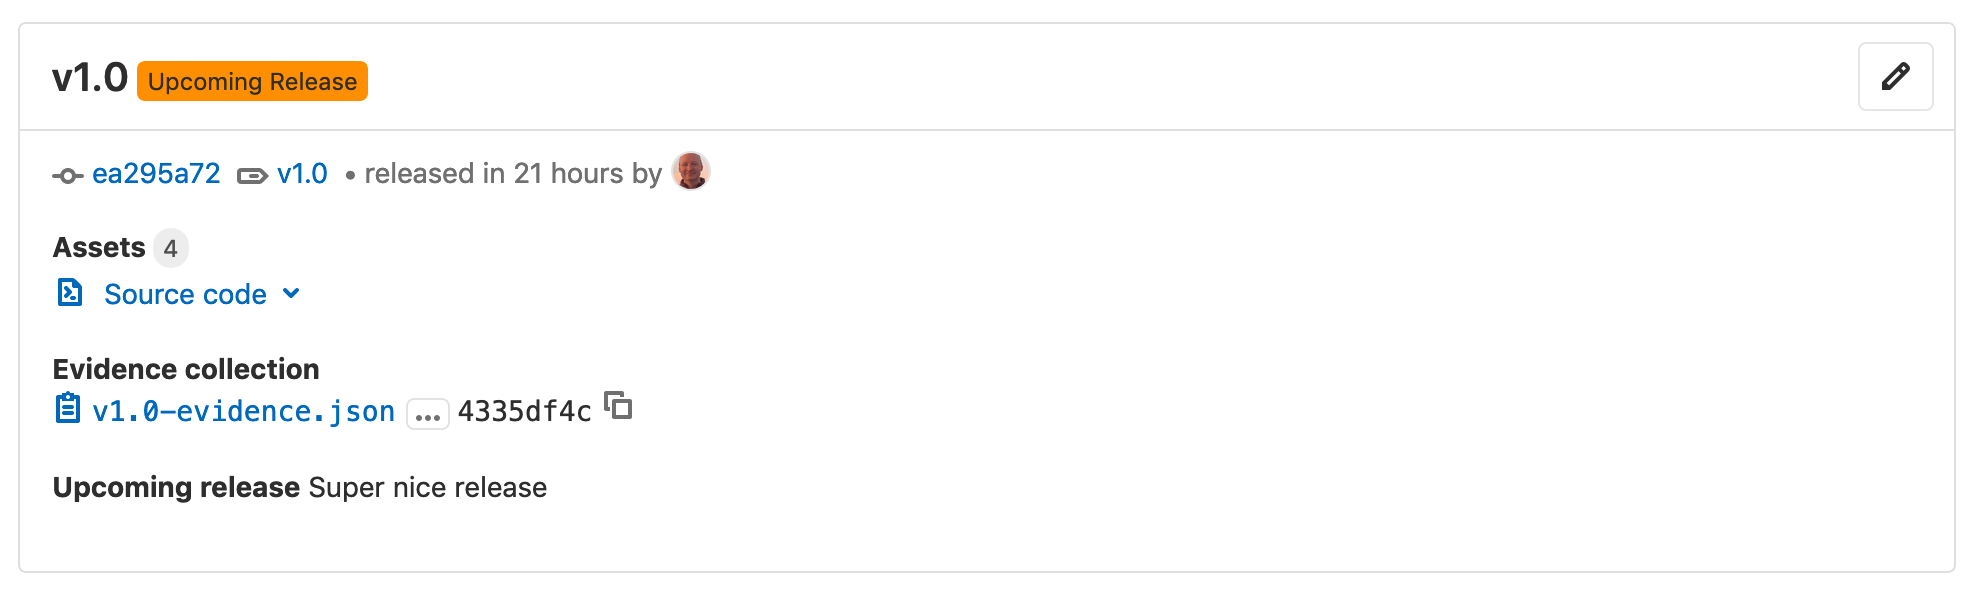
Upcoming releases
Introduced in GitLab 12.1.
You can create a release ahead of time by using the Releases API.
When you set a future released_at date, an Upcoming Release badge is displayed next to the
release tag. When the released_at date and time has passed, the badge is automatically removed.
Edit a release
- Introduced in GitLab 12.6.
- Asset link editing introduced in GitLab 12.10.
Only users with at least the Developer role can edit releases. Read more about Release permissions.
To edit the details of a release:
- On the left sidebar, select Deployments > Releases.
- In the top-right corner of the release you want to modify, click Edit this release (the pencil icon).
- On the Edit Release page, change the release's details.
- Click Save changes.
You can edit the release title, notes, associated milestones, and asset links. To change the release date use the Releases API.
Associate milestones with a release
- Introduced in GitLab 12.5.
- Updated to edit milestones in the UI in GitLab 13.0.
You can associate a release with one or more project milestones.
GitLab Premium customers can specify group milestones to associate with a release.
You can do this in the user interface, or by including a milestones array in your request to
the Releases API.
In the user interface, to associate milestones to a release:
- On the left sidebar, select Deployments > Releases.
- In the top-right corner of the release you want to modify, click Edit this release (the pencil icon).
- From the Milestones list, select each milestone you want to associate. You can select multiple milestones.
- Click Save changes.
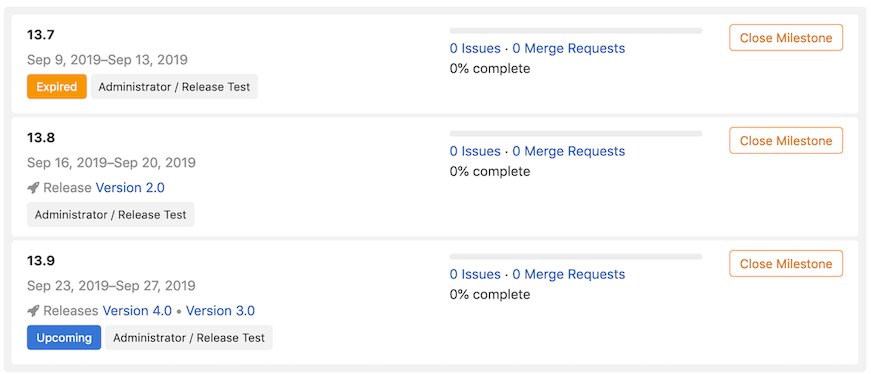
On the Deployments > Releases page, the Milestone is listed in the top section, along with statistics about the issues in the milestones.

Releases are also visible on the Issues > Milestones page, and when you click a milestone on this page.
Here is an example of milestones with no releases, one release, and two releases, respectively.
NOTE: A subgroup's project releases cannot be associated with a supergroup's milestone. To learn more, read issue #328054, Releases cannot be associated with a supergroup milestone.
Get notified when a release is created
Introduced in GitLab 12.4.
You can be notified by email when a new release is created for your project.
To subscribe to notifications for releases:
- On the left sidebar, select Project information.
- Click Notification setting (the bell icon).
- In the list, click Custom.
- Select the New release checkbox.
- Close the dialog box to save.
Prevent unintentional releases by setting a deploy freeze
- Introduced in GitLab 13.0.
- The ability to delete freeze periods through the UI was introduced in GitLab 14.3.
Prevent unintended production releases during a period of time you specify by setting a deploy freeze period. Deploy freezes help reduce uncertainty and risk when automating deployments.
A maintainer can set a deploy freeze window in the user interface or by using the Freeze Periods API to set a freeze_start and a freeze_end, which
are defined as crontab entries.
If the job that's executing is within a freeze period, GitLab CI/CD creates an environment
variable named $CI_DEPLOY_FREEZE.
To prevent the deployment job from executing, create a rules entry in your
.gitlab-ci.yml, for example:
deploy_to_production:
  stage: deploy
  script: deploy_to_prod.sh
  rules:
    - if: $CI_DEPLOY_FREEZE == null
To set a deploy freeze window in the UI, complete these steps:
- Sign in to GitLab as a user with the Maintainer role.
- On the left sidebar, select Project information.
- In the left navigation menu, navigate to Settings > CI/CD.
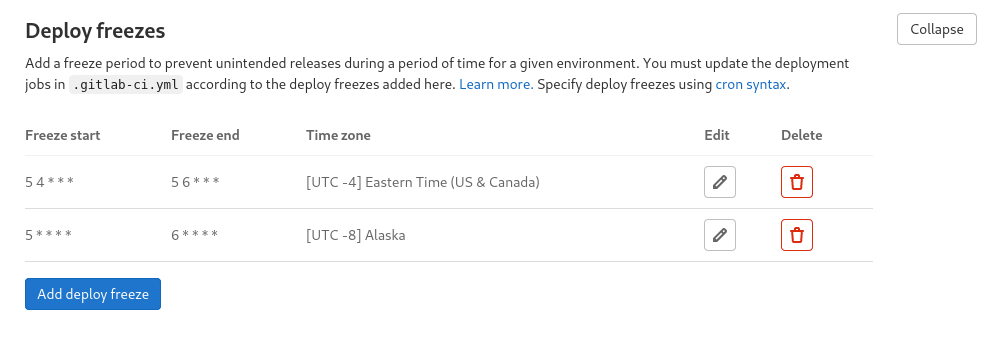
- Scroll to Deploy freezes.
- Click Expand to see the deploy freeze table.
- Click Add deploy freeze to open the deploy freeze modal.
- Enter the start time, end time, and time zone of the desired deploy freeze period.
- Click Add deploy freeze in the modal.
- After the deploy freeze is saved, you can edit it by selecting the edit button ({pencil}) and remove it by selecting the delete button ({remove}).
If a project contains multiple freeze periods, all periods apply. If they overlap, the freeze covers the complete overlapping period.
For more information, see Deployment safety.
Release fields
The following fields are available when you create or edit a release.
Title
The release title can be customized using the Release title field when creating or editing a release. If no title is provided, the release's tag name is used instead.
Tag name
The release tag name should include the release version. GitLab uses Semantic Versioning
for our releases, and we recommend you do too. Use (Major).(Minor).(Patch), as detailed in the
GitLab Policy for Versioning.
For example, for GitLab version 10.5.7:
-
10represents the major version. The major release was10.0.0, but often referred to as10.0. -
5represents the minor version. The minor release was10.5.0, but often referred to as10.5. -
7represents the patch number.
Any part of the version number can be multiple digits, for example, 13.10.11.
Release notes description
Every release has a description. You can add any text you like, but we recommend including a changelog to describe the content of your release. This helps users quickly scan the differences between each release you publish.
Git's tagging messages and Release note descriptions are unrelated. Description supports Markdown.
Release assets
A release contains the following types of assets:
Source code
GitLab automatically generates zip, tar.gz, tar.bz2, and tar
archived source code from the given Git tag. These are read-only assets.
Links
A link is any URL which can point to whatever you like: documentation, built binaries, or other related materials. These can be both internal or external links from your GitLab instance. Each link as an asset has the following attributes:
| Attribute | Description | Required |
|---|---|---|
name |
The name of the link. | Yes |
url |
The URL to download a file. | Yes |
filepath |
The redirect link to the url. See this section for more information. |
No |
link_type |
The content kind of what users can download via url. See this section for more information. |
No |
Permanent links to release assets
Introduced in GitLab 12.9.
The assets associated with a release are accessible through a permanent URL. GitLab always redirects this URL to the actual asset location, so even if the assets move to a different location, you can continue to use the same URL. This is defined during link creation or updating.
The format of the URL is:
https://host/namespace/project/releases/:release/downloads/:filepathIf you have an asset for the v11.9.0-rc2 release in the gitlab-org
namespace and gitlab-runner project on gitlab.com, for example:
{
  "name": "linux amd64",
  "filepath": "/binaries/gitlab-runner-linux-amd64",
  "url": "https://gitlab-runner-downloads.s3.amazonaws.com/v11.9.0-rc2/binaries/gitlab-runner-linux-amd64",
  "link_type": "other"
}
This asset has a direct link of:
https://gitlab.com/gitlab-org/gitlab-runner/releases/v11.9.0-rc2/downloads/binaries/gitlab-runner-linux-amd64The physical location of the asset can change at any time and the direct link remains unchanged.
Link Types
Introduced in GitLab 13.1.
The four types of links are "Runbook," "Package," "Image," and "Other."
The link_type parameter accepts one of the following four values:
runbookpackageimage-
other(default)
This field has no effect on the URL and it's only used for visual purposes in the Releases page of your project.
Use a generic package for attaching binaries
You can use generic packages to store any artifacts from a release or tag pipeline, that can also be used for attaching binary files to an individual release entry. You basically need to:
The following example generates release assets, publishes them as a generic package, and then creates a release:
stages:
  - build
  - upload
  - release

variables:
  # Package version can only contain numbers (0-9), and dots (.).
  # Must be in the format of X.Y.Z, i.e. should match /\A\d+\.\d+\.\d+\z/ regular expresion.
  # See https://docs.gitlab.com/ee/user/packages/generic_packages/#publish-a-package-file
  PACKAGE_VERSION: "1.2.3"
  DARWIN_AMD64_BINARY: "myawesomerelease-darwin-amd64-${PACKAGE_VERSION}"
  LINUX_AMD64_BINARY: "myawesomerelease-linux-amd64-${PACKAGE_VERSION}"
  PACKAGE_REGISTRY_URL: "${CI_API_V4_URL}/projects/${CI_PROJECT_ID}/packages/generic/myawesomerelease/${PACKAGE_VERSION}"

build:
  stage: build
  image: alpine:latest
  rules:
    - if: $CI_COMMIT_TAG
  script:
    - mkdir bin
    - echo "Mock binary for ${DARWIN_AMD64_BINARY}" > bin/${DARWIN_AMD64_BINARY}
    - echo "Mock binary for ${LINUX_AMD64_BINARY}" > bin/${LINUX_AMD64_BINARY}
  artifacts:
    paths:
      - bin/

upload:
  stage: upload
  image: curlimages/curl:latest
  rules:
    - if: $CI_COMMIT_TAG
  script:
    - |
      curl --header "JOB-TOKEN: ${CI_JOB_TOKEN}" --upload-file bin/${DARWIN_AMD64_BINARY} "${PACKAGE_REGISTRY_URL}/${DARWIN_AMD64_BINARY}"
    - |
      curl --header "JOB-TOKEN: ${CI_JOB_TOKEN}" --upload-file bin/${LINUX_AMD64_BINARY} "${PACKAGE_REGISTRY_URL}/${LINUX_AMD64_BINARY}"

release:
  # Caution, as of 2021-02-02 these assets links require a login, see:
  # https://gitlab.com/gitlab-org/gitlab/-/issues/299384
  stage: release
  image: registry.gitlab.com/gitlab-org/release-cli:latest
  rules:
    - if: $CI_COMMIT_TAG
  script:
    - |
      release-cli create --name "Release $CI_COMMIT_TAG" --tag-name $CI_COMMIT_TAG \
        --assets-link "{\"name\":\"${DARWIN_AMD64_BINARY}\",\"url\":\"${PACKAGE_REGISTRY_URL}/${DARWIN_AMD64_BINARY}\"}" \
        --assets-link "{\"name\":\"${LINUX_AMD64_BINARY}\",\"url\":\"${PACKAGE_REGISTRY_URL}/${LINUX_AMD64_BINARY}\"}"
PowerShell users may need to escape the double quote " inside a JSON
string with a ` (back tick) for --assets-link and ConvertTo-Json
before passing on to the release-cli.
For example:
release:
  script:
    - $env:asset = "{`"name`":`"MyFooAsset`",`"url`":`"https://gitlab.com/upack/artifacts/download/$env:UPACK_GROUP/$env:UPACK_NAME/$($env:GitVersion_SemVer)?contentOnly=zip`"}"
    - $env:assetjson = $env:asset | ConvertTo-Json
    - release-cli create --name $CI_COMMIT_TAG --description "Release $CI_COMMIT_TAG" --ref $CI_COMMIT_TAG --tag-name $CI_COMMIT_TAG --assets-link=$env:assetjson
NOTE: Directly attaching job artifacts links to a release is not recommended, because artifacts are ephemeral and are used to pass data in the same pipeline. This means there's a risk that they could either expire or someone might manually delete them.
Number of new and total features (FREE SAAS)
Introduced in GitLab 13.5.
On GitLab.com, you can view the number of new and total features in the project.

The totals are displayed on shields and are generated per release by
a Rake task in the www-gitlab-com repo.
| Item | Formula |
|---|---|
New features |
Total count of release posts across all tiers for a single release in the project. |
Total features |
Total count of release posts in reverse order for all releases in the project. |
The counts are also shown by license tier.
| Item | Formula |
|---|---|
New features |
Total count of release posts across a single tier for a single release in the project. |
Total features |
Total count of release posts across a single tier in reverse order for all releases in the project. |
Release evidence
Introduced in GitLab 12.6.
Each time a release is created, GitLab takes a snapshot of data that's related to it. This data is saved in a JSON file and called release evidence. The feature includes test artifacts and linked milestones to facilitate internal processes, like external audits.
To access the release evidence, on the Releases page, click the link to the JSON file that's listed under the Evidence collection heading.
You can also use the API to generate release evidence for an existing release. Because of this, each release can have multiple release evidence snapshots. You can view the release evidence and its details on the Releases page.
When the issue tracker is disabled, release evidence can't be downloaded.
Here is an example of a release evidence object:
{
  "release": {
    "id": 5,
    "tag_name": "v4.0",
    "name": "New release",
    "project": {
      "id": 20,
      "name": "Project name",
      "created_at": "2019-04-14T11:12:13.940Z",
      "description": "Project description"
    },
    "created_at": "2019-06-28 13:23:40 UTC",
    "description": "Release description",
    "milestones": [
      {
        "id": 11,
        "title": "v4.0-rc1",
        "state": "closed",
        "due_date": "2019-05-12 12:00:00 UTC",
        "created_at": "2019-04-17 15:45:12 UTC",
        "issues": [
          {
            "id": 82,
            "title": "The top-right popup is broken",
            "author_name": "John Doe",
            "author_email": "john@doe.com",
            "state": "closed",
            "due_date": "2019-05-10 12:00:00 UTC"
          },
          {
            "id": 89,
            "title": "The title of this page is misleading",
            "author_name": "Jane Smith",
            "author_email": "jane@smith.com",
            "state": "closed",
            "due_date": "nil"
          }
        ]
      },
      {
        "id": 12,
        "title": "v4.0-rc2",
        "state": "closed",
        "due_date": "2019-05-30 18:30:00 UTC",
        "created_at": "2019-04-17 15:45:12 UTC",
        "issues": []
      }
    ],
    "report_artifacts": [
      {
        "url":"https://gitlab.example.com/root/project-name/-/jobs/111/artifacts/download"
      }
    ]
  }
}
Collect release evidence (PREMIUM SELF)
Introduced in GitLab Premium 12.10.
When a release is created, release evidence is automatically collected. To initiate evidence collection any other time, use an API call. You can collect release evidence multiple times for one release.
Evidence collection snapshots are visible on the Releases page, along with the timestamp the evidence was collected.
Include report artifacts as release evidence (ULTIMATE)
Introduced in GitLab Ultimate 13.2.
When you create a release, if job artifacts are included in the last pipeline that ran, they are automatically included in the release as release evidence.
Although job artifacts normally expire, artifacts included in release evidence do not expire.
To enable job artifact collection you need to specify both:
ruby:
  script:
    - gem install bundler
    - bundle install
    - bundle exec rspec --format progress --format RspecJunitFormatter --out rspec.xml
  artifacts:
    paths:
      - rspec.xml
    reports:
      junit: rspec.xml
If the pipeline ran successfully, when you create your release, the rspec.xml file is saved as
release evidence.
If you schedule release evidence collection,
some artifacts may already be expired by the time of evidence collection. To avoid this you can use
the artifacts:expire_in
keyword. Learn more in this issue.
Schedule release evidence collection
Introduced in GitLab 12.8.
In the API:
- If you specify a future
released_atdate, the release becomes an Upcoming Release and the evidence is collected on the date of the release. You cannot collect release evidence before then. - If you use a past
released_atdate, no evidence is collected. - If you do not specify a
released_atdate, release evidence is collected on the date the release is created.
Release permissions
The permission model for create, update and delete actions was fixed in GitLab 14.1.
View a release and download assets
Changes were made to the Guest role access in GitLab 14.5.
- Users with the Reporter role or above have read and download access to the project releases.
- Users with the Guest role have read and download access to the project releases. This includes associated Git-tag-names, release description, author information of the releases. However, other repository-related information, such as source code, release evidence are redacted.
Create, update, and delete a release and its assets
- Users with Developer role or above have write access to the project releases and assets.
- If a release is associated with a protected tag, the user must be allowed to create the protected tag too.
As an example of release permission control, you can allow only
Maintainer role or above
to create, update, and delete releases by protecting the tag with a wildcard (*),
and set Maintainer in the Allowed to create column.
Release Command Line
Introduced in GitLab 12.10.
The Release CLI is a command-line tool for managing GitLab Releases from the command line or from
the GitLab CI/CD configuration file, .gitlab-ci.yml.
With it, you can create, update, modify, and delete releases right through the terminal.
Read the Release CLI documentation for details.
Release Metrics (ULTIMATE)
Introduced in GitLab Premium 13.9.
Group-level release metrics are available by navigating to Group > Analytics > CI/CD. These metrics include:
- Total number of releases in the group
- Percentage of projects in the group that have at least one release
Working example project
The Guided Exploration project Utterly Automated Software and Artifact Versioning with GitVersion demonstrates:
- Using GitLab releases.
- Using the GitLab
release-cli. - Creating a generic package.
- Linking the package to the release.
- Using a tool called GitVersion to automatically determine and increment versions for complex repositories.
You can copy the example project to your own group or instance for testing. More details on what other GitLab CI patterns are demonstrated are available at the project page.
Troubleshooting
Getting 403 Forbidden or Something went wrong while creating a new release errors when creating, updating or deleting releases and their assets
If the release is associated with a protected tag, the UI/API request might result in an authorization failure. Make sure that the user or a service/bot account is allowed to create the protected tag too.
See the release permissions for more information.
Note about storage
Note that the feature is built on top of Git tags, so virtually no extra data is needed besides to create the release itself. Additional assets and the release evidence that is automatically generated consume storage.